

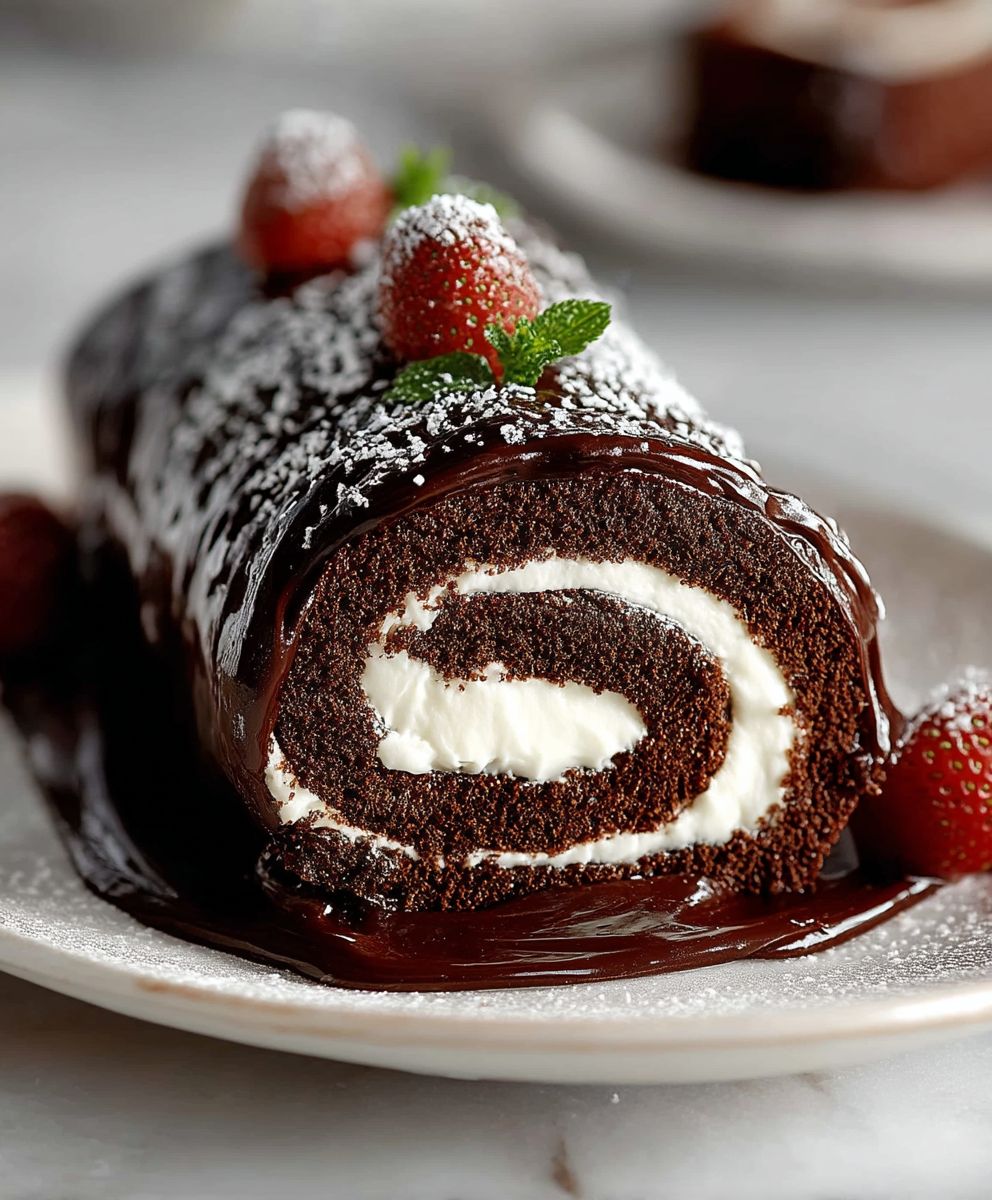
Chocolate Swiss Roll: Just the name conjures up images of elegant desserts and cozy afternoons, doesn’t it? I remember the first time I saw a perfectly executed Swiss roll a swirl of chocolate cake embracing a cloud of creamy filling. It looked like something straight out of a patisserie window, and I was instantly captivated.
While its exact origins are debated, the rolled cake technique has been around for centuries, with variations popping up across Europe. Some believe it evolved from the jelly roll, a similar concept but often filled with fruit preserves. Regardless of its precise history, the Chocolate Swiss Roll has become a beloved classic, gracing tables at celebrations and comforting us on ordinary days alike.
So, what makes this dessert so irresistible? It’s the delightful combination of textures the light, airy sponge cake, the smooth, rich chocolate flavor, and the creamy, melt-in-your-mouth filling. Plus, while it may look impressive, a Chocolate Swiss Roll is surprisingly straightforward to make at home. I’m going to guide you through each step, ensuring your own creation is a showstopper. Get ready to impress your friends and family (or just treat yourself!) with this timeless treat.

Ingredients:
- For the Sponge Cake:
- 1 cup (120g) cake flour, sifted
- 1/4 cup (25g) unsweetened cocoa powder, sifted
- 1/2 teaspoon baking powder
- 1/4 teaspoon salt
- 5 large eggs, separated
- 3/4 cup (150g) granulated sugar, divided
- 1/4 cup (60ml) whole milk
- 2 tablespoons (30ml) vegetable oil
- 1 teaspoon vanilla extract
- Powdered sugar, for dusting
- For the Chocolate Cream Filling:
- 1 cup (240ml) heavy cream
- 1/4 cup (30g) powdered sugar, sifted
- 1/4 cup (60g) mascarpone cheese, softened
- 1/4 cup (60g) semi-sweet chocolate, melted and cooled slightly
- 1 teaspoon vanilla extract
- Optional Chocolate Ganache (for decoration):
- 4 ounces (115g) semi-sweet chocolate, chopped
- 1/2 cup (120ml) heavy cream
Preparing the Sponge Cake
- Preheat and Prepare: First things first, let’s preheat your oven to 350°F (175°C). While it’s heating up, grease a 10×15 inch jelly roll pan really well. I like to use baking spray with flour, but you can also grease it with butter and then dust it with flour, making sure to tap out any excess. Line the bottom of the pan with parchment paper, leaving an overhang on the two longer sides. This will make it super easy to lift the cake out later!
- Combine Dry Ingredients: In a medium bowl, whisk together the sifted cake flour, sifted cocoa powder, baking powder, and salt. Sifting is key here it helps to ensure a light and airy cake. Set this bowl aside for now.
- Separate Eggs: Carefully separate the eggs, placing the yolks in a large bowl and the whites in a clean, grease-free bowl. Make sure no yolk gets into the whites, or they won’t whip up properly.
- Whip Egg Yolks: Add half of the granulated sugar (6 tablespoons) to the egg yolks and beat with an electric mixer on medium-high speed until the mixture is pale yellow and thick. This usually takes about 3-5 minutes.
- Add Wet Ingredients to Yolks: Gradually add the milk, vegetable oil, and vanilla extract to the egg yolk mixture, mixing on low speed until just combined. Be careful not to overmix at this stage.
- Combine Wet and Dry Ingredients: Gradually add the dry ingredients to the wet ingredients, mixing on low speed until just combined. Again, be careful not to overmix. Overmixing can lead to a tough cake.
- Whip Egg Whites: In the bowl with the egg whites, beat with an electric mixer on medium speed until soft peaks form. Gradually add the remaining granulated sugar (6 tablespoons) and continue beating until stiff, glossy peaks form. The peaks should hold their shape but not be dry.
- Fold Egg Whites into Batter: Gently fold one-third of the whipped egg whites into the chocolate batter to lighten it. Then, gently fold in the remaining egg whites until just combined. Be careful not to deflate the egg whites, as this will affect the cake’s texture.
- Bake the Cake: Pour the batter into the prepared jelly roll pan and spread it evenly. Bake for 12-15 minutes, or until a toothpick inserted into the center comes out clean. The cake should spring back lightly when touched.
Rolling and Cooling the Cake
- Prepare for Rolling: While the cake is baking, prepare a clean kitchen towel or a large sheet of parchment paper. Dust it generously with powdered sugar. This will prevent the cake from sticking when you roll it.
- Invert and Roll: As soon as the cake comes out of the oven, immediately invert it onto the prepared towel or parchment paper. Carefully peel off the parchment paper that lined the bottom of the pan.
- Roll the Cake: Starting from one of the shorter ends, gently roll the cake up tightly in the towel or parchment paper. Be careful not to crack the cake. The powdered sugar will help prevent sticking.
- Cool Completely: Place the rolled cake on a wire rack and let it cool completely. This usually takes about an hour. Cooling the cake in the rolled position will help it maintain its shape and prevent it from cracking when you fill it.
Preparing the Chocolate Cream Filling
- Whip Heavy Cream: In a large bowl, whip the heavy cream with an electric mixer on medium-high speed until soft peaks form.
- Add Powdered Sugar and Mascarpone: Gradually add the sifted powdered sugar and softened mascarpone cheese to the whipped cream, mixing on low speed until just combined. Be careful not to overmix, as this can cause the cream to curdle.
- Add Chocolate and Vanilla: Gently fold in the melted and slightly cooled semi-sweet chocolate and vanilla extract until just combined.
- Chill the Filling: Cover the bowl with plastic wrap and refrigerate the filling for at least 30 minutes to allow it to firm up slightly. This will make it easier to spread on the cake.
Assembling the Swiss Roll
- Unroll the Cake: Carefully unroll the cooled cake. If the cake sticks to the towel or parchment paper, gently loosen it with a spatula.
- Spread the Filling: Spread the chocolate cream filling evenly over the cake, leaving a 1/2-inch border along one of the longer edges. This will prevent the filling from squeezing out when you roll it up.
- Reroll the Cake: Starting from the edge with the filling, gently reroll the cake tightly. Use the towel or parchment paper to help you roll it up evenly.
- Wrap and Chill: Wrap the Swiss roll tightly in plastic wrap and refrigerate for at least 2 hours, or preferably overnight. This will allow the filling to set and the flavors to meld together.
Optional: Preparing the Chocolate Ganache
- Heat Heavy Cream: Place the chopped chocolate in a heatproof bowl. In a small saucepan, heat the heavy cream over medium heat until it just comes to a simmer. Do not boil.
- Pour Over Chocolate: Pour the hot heavy cream over the chopped chocolate and let it sit for 1 minute to soften the chocolate.
- Stir Until Smooth: Gently stir the mixture until the chocolate is completely melted and the ganache is smooth and glossy.
- Cool Slightly: Let the ganache cool slightly before using it to decorate the Swiss roll. This will help it thicken up and prevent it from running off the cake.
Decorating and Serving
- Trim the Ends: Before decorating, trim the ends of the Swiss roll with a sharp knife to create clean, even edges.
- Decorate with Ganache (Optional): If using, pour the slightly cooled chocolate ganache over the Swiss roll and spread it evenly. You can also drizzle the ganache over the cake for a more decorative effect.
- Dust with Powdered Sugar: Dust the Swiss roll with powdered sugar for a finishing touch.
- Slice and Serve: Slice the Swiss roll into 1-inch thick slices and serve. Enjoy! This Chocolate Swiss Roll is best served chilled.
Conclusion:
And there you have it! This Chocolate Swiss Roll recipe is truly a must-try for anyone who loves a decadent, impressive-looking dessert that’s surprisingly simple to make. From the rich, moist chocolate sponge to the light and airy whipped cream filling, every bite is a symphony of textures and flavors. It’s the kind of dessert that will have your family and friends begging for seconds, and it’s guaranteed to become a new favorite in your baking repertoire.
But why is this particular Chocolate Swiss Roll so special? It’s all about the balance. The chocolate sponge is intensely chocolatey without being overly sweet, and the whipped cream provides the perfect creamy counterpoint. Plus, the rolling technique, while it might seem intimidating at first, is actually quite straightforward once you get the hang of it. And trust me, the satisfaction of unveiling that perfectly swirled roll is totally worth the effort!
Beyond its inherent deliciousness, this recipe is also incredibly versatile. Feel free to experiment with different fillings. While I’m partial to classic whipped cream, you could easily substitute it with chocolate ganache for an even richer experience, or perhaps a tangy cream cheese frosting to cut through the sweetness. Imagine a raspberry jam filling for a burst of fruity flavor, or even a coffee-infused cream for a mocha twist. The possibilities are truly endless!
For serving suggestions, a simple dusting of powdered sugar is always a classic and elegant touch. You could also drizzle it with melted chocolate or garnish it with fresh berries for a pop of color and freshness. A scoop of vanilla ice cream on the side would elevate it to a truly decadent dessert experience. And if you’re feeling extra fancy, you could even slice it into individual portions and serve them with a dollop of whipped cream and a sprinkle of chocolate shavings.
This Chocolate Swiss Roll is also perfect for special occasions. It’s impressive enough to serve at a dinner party, yet easy enough to whip up for a casual weekend gathering. It’s a guaranteed crowd-pleaser that will leave everyone feeling satisfied and impressed with your baking skills. Plus, it travels well, making it a great option for potlucks and picnics.
Don’t be afraid to get creative and personalize this recipe to your own tastes. Add a splash of liqueur to the whipped cream for an extra kick, or sprinkle some chopped nuts on top for added texture. The beauty of baking is that it’s all about experimentation and finding what works best for you.
I truly believe that this recipe is a winner, and I can’t wait for you to try it. So, gather your ingredients, preheat your oven, and get ready to embark on a delicious baking adventure. I promise you won’t be disappointed!
And most importantly, I’d love to hear about your experience! Did you try a different filling? Did you add any special touches? Share your photos and stories in the comments below. I’m always eager to see how you make this recipe your own. Happy baking, and enjoy your delicious Chocolate Swiss Roll! I hope this recipe becomes a cherished part of your baking traditions for years to come. Let me know how it turns out!
Chocolate Swiss Roll: The Ultimate Guide to Baking Perfection
Indulge in this decadent Chocolate Swiss Roll! A light and airy chocolate sponge cake filled with a luscious chocolate cream, perfect for any occasion.
Ingredients
- 1 cup (120g) cake flour, sifted
- 1/4 cup (25g) unsweetened cocoa powder, sifted
- 1/2 teaspoon baking powder
- 1/4 teaspoon salt
- 5 large eggs, separated
- 3/4 cup (150g) granulated sugar, divided
- 1/4 cup (60ml) whole milk
- 2 tablespoons (30ml) vegetable oil
- 1 teaspoon vanilla extract
- Powdered sugar, for dusting
- 1 cup (240ml) heavy cream
- 1/4 cup (30g) powdered sugar, sifted
- 1/4 cup (60g) mascarpone cheese, softened
- 1/4 cup (60g) semi-sweet chocolate, melted and cooled slightly
- 1 teaspoon vanilla extract
- 4 ounces (115g) semi-sweet chocolate, chopped
- 1/2 cup (120ml) heavy cream
Instructions
- Preheat oven to 350°F (175°C). Grease a 10×15 inch jelly roll pan well with baking spray or butter and flour. Line the bottom with parchment paper, leaving an overhang.
- In a medium bowl, whisk together sifted cake flour, sifted cocoa powder, baking powder, and salt. Set aside.
- Separate eggs, placing yolks in a large bowl and whites in a clean, grease-free bowl.
- Add half of the granulated sugar (6 tablespoons) to the egg yolks and beat with an electric mixer on medium-high speed until pale yellow and thick (3-5 minutes).
- Gradually add milk, vegetable oil, and vanilla extract to the egg yolk mixture, mixing on low speed until just combined.
- Gradually add the dry ingredients to the wet ingredients, mixing on low speed until just combined.
- In the bowl with the egg whites, beat with an electric mixer on medium speed until soft peaks form. Gradually add the remaining granulated sugar (6 tablespoons) and continue beating until stiff, glossy peaks form.
- Gently fold one-third of the whipped egg whites into the chocolate batter to lighten it. Then, gently fold in the remaining egg whites until just combined.
- Pour the batter into the prepared jelly roll pan and spread it evenly. Bake for 12-15 minutes, or until a toothpick inserted into the center comes out clean.
- Prepare a clean kitchen towel or a large sheet of parchment paper. Dust it generously with powdered sugar.
- As soon as the cake comes out of the oven, immediately invert it onto the prepared towel or parchment paper. Carefully peel off the parchment paper that lined the bottom of the pan.
- Starting from one of the shorter ends, gently roll the cake up tightly in the towel or parchment paper.
- Place the rolled cake on a wire rack and let it cool completely (about 1 hour).
- In a large bowl, whip the heavy cream with an electric mixer on medium-high speed until soft peaks form.
- Gradually add the sifted powdered sugar and softened mascarpone cheese to the whipped cream, mixing on low speed until just combined.
- Gently fold in the melted and slightly cooled semi-sweet chocolate and vanilla extract until just combined.
- Cover the bowl with plastic wrap and refrigerate the filling for at least 30 minutes.
- Carefully unroll the cooled cake.
- Spread the chocolate cream filling evenly over the cake, leaving a 1/2-inch border along one of the longer edges.
- Starting from the edge with the filling, gently reroll the cake tightly. Use the towel or parchment paper to help you roll it up evenly.
- Wrap the Swiss roll tightly in plastic wrap and refrigerate for at least 2 hours, or preferably overnight.
- Place the chopped chocolate in a heatproof bowl. In a small saucepan, heat the heavy cream over medium heat until it just comes to a simmer. Do not boil.
- Pour the hot heavy cream over the chopped chocolate and let it sit for 1 minute to soften the chocolate.
- Gently stir the mixture until the chocolate is completely melted and the ganache is smooth and glossy.
- Let the ganache cool slightly before using it to decorate the Swiss roll.
- Trim the ends of the Swiss roll with a sharp knife to create clean, even edges.
- If using, pour the slightly cooled chocolate ganache over the Swiss roll and spread it evenly. You can also drizzle the ganache over the cake for a more decorative effect.
- Dust the Swiss roll with powdered sugar for a finishing touch.
- Slice the Swiss roll into 1-inch thick slices and serve.
Notes
- Sifting the flour and cocoa powder is crucial for a light and airy cake.
- Be careful not to overmix the batter, as this can result in a tough cake.
- Cooling the cake completely in the rolled position prevents cracking.
- Chilling the filling helps it firm up and makes it easier to spread.
- For best results, chill the assembled Swiss roll for at least 2 hours, or preferably overnight.


Leave a Comment