

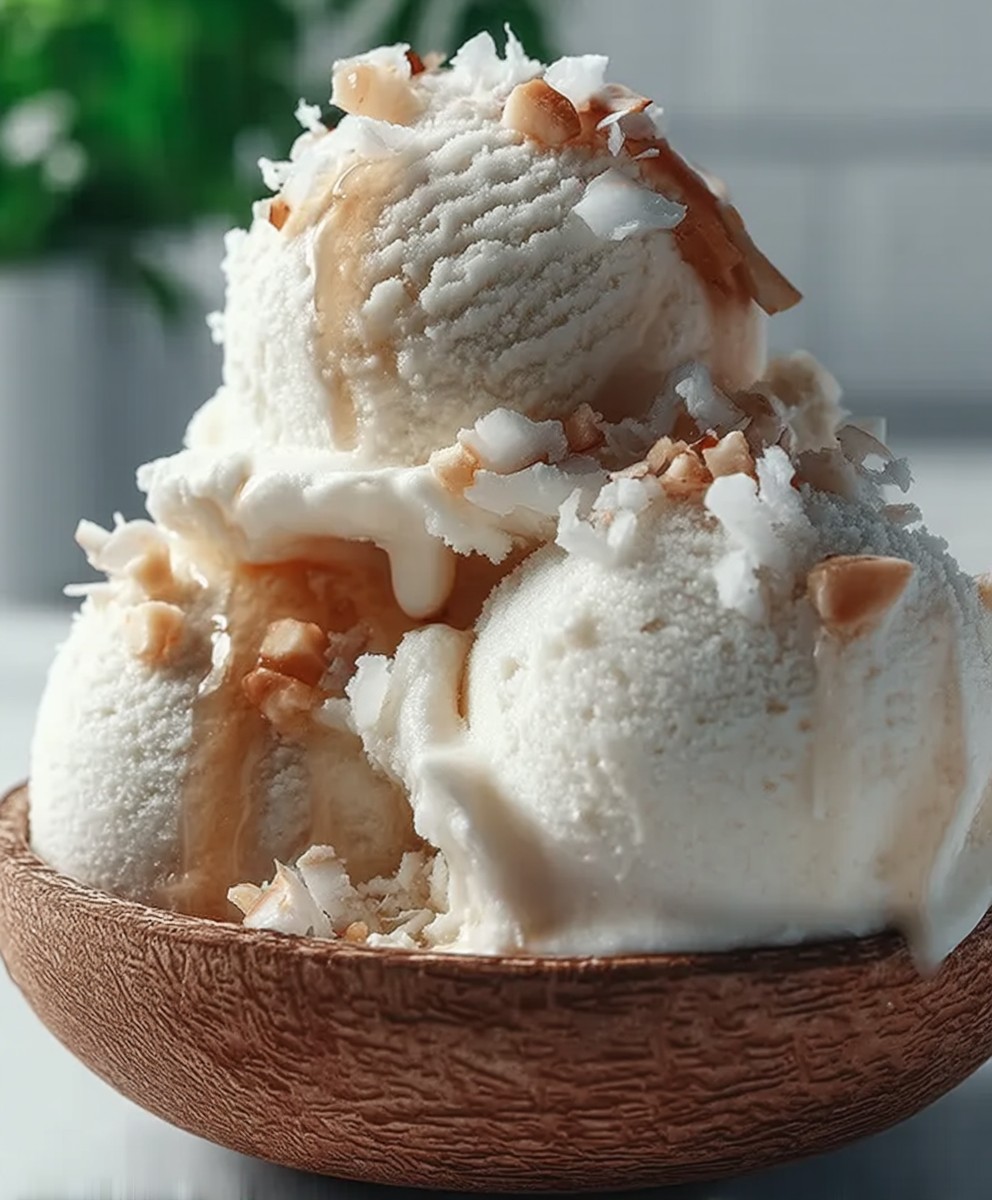
Coconut Macadamia Nut Ice Cream: Prepare to be transported to a tropical paradise with every spoonful of this decadent, creamy delight! Forget everything you thought you knew about homemade ice cream because this recipe is a game-changer. Imagine the rich, smooth texture of coconut milk perfectly blended with the buttery crunch of macadamia nuts it’s an explosion of flavor that will leave you craving more.
While ice cream’s origins can be traced back centuries, the addition of tropical ingredients like coconut and macadamia nuts elevates it to a whole new level. Coconut, a staple in many Southeast Asian and Pacific Island cuisines, brings a subtle sweetness and creamy texture that perfectly complements the rich, buttery flavor of macadamia nuts, native to Australia. This combination is a celebration of global flavors, bringing a touch of exotic indulgence to your dessert table.
People adore this Coconut Macadamia Nut Ice Cream for its luxurious taste and satisfying texture. The creamy coconut base melts in your mouth, while the crunchy macadamia nuts provide a delightful contrast. It’s also surprisingly easy to make, requiring minimal ingredients and effort. Whether you’re looking for a refreshing treat on a hot summer day or a sophisticated dessert to impress your guests, this ice cream is guaranteed to be a crowd-pleaser. So, grab your ice cream maker and let’s embark on a culinary adventure to create this unforgettable frozen masterpiece!

Ingredients:
- 2 (13.5 ounce) cans full-fat coconut milk, refrigerated overnight
- 1 cup unsweetened shredded coconut
- 1 cup raw macadamia nuts, plus extra for garnish
- ¾ cup granulated sugar (or substitute with maple syrup or agave nectar to taste)
- ¼ teaspoon sea salt
- 1 teaspoon vanilla extract
- 2 tablespoons coconut oil, melted
- Optional: ¼ cup coconut cream (scooped from the top of the refrigerated coconut milk) for extra creaminess
Preparing the Coconut Macadamia Base:
Alright, let’s get started with the base of our delicious ice cream! The key here is to have patience and let the flavors meld together beautifully. We’re aiming for a rich, creamy, and intensely coconutty experience with a delightful macadamia nut crunch.
- Chill the Coconut Milk: This is crucial! Make sure your cans of full-fat coconut milk have been chilling in the refrigerator overnight (or even longer). This allows the thick coconut cream to separate from the watery liquid. We only want the thick cream for the richest ice cream possible.
- Scoop Out the Coconut Cream: Carefully open the cans of chilled coconut milk, being careful not to shake them. Gently scoop out the thick, solidified coconut cream from the top of each can, leaving the watery liquid behind. Place the coconut cream in a high-speed blender or food processor. If you want to add extra creaminess, now is the time to add the optional ¼ cup of coconut cream.
- Toast the Shredded Coconut: Preheat your oven to 350°F (175°C). Spread the shredded coconut evenly on a baking sheet. Toast in the preheated oven for 5-7 minutes, or until lightly golden brown and fragrant. Keep a close eye on it, as it can burn quickly! Remove from the oven and let it cool completely. Toasting the coconut enhances its flavor and adds a lovely depth to the ice cream.
- Toast the Macadamia Nuts: Spread the macadamia nuts on a separate baking sheet. Toast in the preheated oven for 8-10 minutes, or until lightly golden brown and fragrant. Again, watch them carefully to prevent burning. Let them cool completely. Toasting the macadamia nuts brings out their natural oils and nutty flavor, making them even more delicious.
- Combine Ingredients in Blender: Add the toasted shredded coconut, toasted macadamia nuts, sugar (or your chosen sweetener), sea salt, vanilla extract, and melted coconut oil to the blender or food processor with the coconut cream.
- Blend Until Smooth: Blend everything on high speed until completely smooth and creamy. This may take a few minutes, depending on the power of your blender. Stop occasionally to scrape down the sides of the blender to ensure everything is fully incorporated. You want a silky-smooth base with no gritty bits of coconut or nuts.
- Taste and Adjust: Give the mixture a taste and adjust the sweetness or saltiness to your liking. If you prefer a sweeter ice cream, add a little more sugar or sweetener. If you want a more pronounced coconut flavor, you can add a few drops of coconut extract (but be careful not to overdo it!).
- Chill the Base: Pour the blended mixture into an airtight container and refrigerate for at least 4 hours, or preferably overnight. This chilling period is essential for the flavors to meld together and for the base to thicken slightly. A well-chilled base will result in a smoother, creamier ice cream.
Churning the Ice Cream:
Now comes the fun part churning the ice cream! This is where the magic happens and our chilled base transforms into a frozen delight. Make sure your ice cream maker bowl is properly frozen according to the manufacturer’s instructions. This usually involves freezing it for at least 15-24 hours.
- Prepare the Ice Cream Maker: Take your ice cream maker bowl out of the freezer. It should be rock solid. Assemble the ice cream maker according to the manufacturer’s instructions.
- Pour in the Chilled Base: Pour the chilled coconut macadamia base into the prepared ice cream maker.
- Churn According to Instructions: Turn on the ice cream maker and churn according to the manufacturer’s instructions. This usually takes about 20-30 minutes, or until the ice cream reaches a soft-serve consistency. The churning process incorporates air into the mixture, creating a light and fluffy texture.
- Check the Consistency: Keep an eye on the ice cream as it churns. You want it to be thick and creamy, but not too hard. It should have the consistency of soft-serve ice cream. If it’s too soft, you can freeze it for a longer period after churning.
Freezing and Serving:
We’re almost there! Once the ice cream has reached the desired consistency, it’s time to transfer it to a freezer-safe container for final hardening. This step is crucial for achieving that perfect scoopable texture.
- Transfer to Freezer-Safe Container: Carefully transfer the churned ice cream to a freezer-safe container. A loaf pan or a plastic container with a tight-fitting lid works well.
- Smooth the Surface: Gently smooth the surface of the ice cream with a spatula or spoon. This will help prevent ice crystals from forming on the surface.
- Add Garnish (Optional): If desired, sprinkle some extra toasted macadamia nuts on top of the ice cream for added crunch and visual appeal.
- Freeze to Harden: Cover the container tightly with a lid or plastic wrap and freeze for at least 2-3 hours, or preferably overnight, to allow the ice cream to harden completely. This will give it a more scoopable consistency.
- Scoop and Serve: When you’re ready to serve, remove the ice cream from the freezer and let it sit at room temperature for a few minutes to soften slightly. This will make it easier to scoop.
- Enjoy! Scoop the ice cream into bowls or cones and enjoy! You can serve it plain or with your favorite toppings, such as chocolate sauce, caramel sauce, or fresh fruit.
Tips for Success:
- Use Full-Fat Coconut Milk: This is essential for a creamy and rich ice cream. Light coconut milk will result in a watery and less flavorful ice cream.
- Chill Everything: Make sure your coconut milk is well-chilled, and your ice cream maker bowl is properly frozen. This will help the ice cream churn faster and more efficiently.
- Don’t Over-Churn: Over-churning can result in a grainy or icy texture. Churn until the ice cream reaches a soft-serve consistency, then transfer it to the freezer to harden.
- Store Properly: Store the ice cream in an airtight container in the freezer to prevent freezer burn.
- Experiment with Flavors: Feel free to experiment with different flavors and add-ins. You can add chocolate chips, chopped nuts, or fruit purees to customize your ice cream.
Troubleshooting:
- Ice Cream is Too Icy: This can be caused by using light coconut milk, not chilling the base properly, or over-churning. Make sure to use full-fat coconut milk, chill the base thoroughly, and churn until the ice cream reaches a soft-serve consistency.
- Ice Cream is Too Hard: This can be caused by freezing the ice cream for too long. Let it sit at room temperature for a few minutes before scooping to soften it slightly.
- Ice Cream is Not Sweet Enough: Adjust the amount of sugar or sweetener to your liking. You can also add a few drops of stevia or other sugar substitutes.
Conclusion:
So, there you have it! This Coconut Macadamia Nut Ice Cream recipe is more than just a frozen dessert; it’s a tropical escape in every spoonful. I truly believe this is a must-try recipe for anyone who loves creamy, decadent, and slightly exotic flavors. The combination of the rich coconut milk, the buttery macadamia nuts, and the subtle sweetness is simply irresistible. Its a symphony of textures and tastes that will leave you wanting more.
Why is it a must-try? Well, beyond the incredible flavor profile, it’s surprisingly easy to make. You don’t need any fancy equipment beyond a standard ice cream maker, and the ingredients are readily available. Plus, it’s a fantastic way to impress your friends and family with a homemade treat that tastes like it came straight from a gourmet ice cream shop. Forget the store-bought stuff this is the real deal!
But the best part? It’s incredibly versatile! While I adore it just as it is, there are so many ways you can customize this recipe to suit your own preferences.
Serving Suggestions and Variations:
* Classic Scoop: Serve it in a classic waffle cone or a simple bowl. A sprinkle of toasted coconut flakes or chopped macadamia nuts adds a lovely finishing touch.
* Sundae Sensation: Transform it into a decadent sundae with hot fudge sauce, whipped cream, and a maraschino cherry on top.
* Tropical Parfait: Layer it with chunks of fresh pineapple, mango, and toasted coconut for a refreshing tropical parfait.
* Affogato Al Fresco: Pour a shot of hot espresso over a scoop for an Italian-inspired affogato. The contrast of the hot coffee and cold ice cream is divine!
* Baked Alaska Upgrade: Use it as the ice cream base for a show-stopping Baked Alaska.
* Vegan Variation: For a completely vegan version, ensure your coconut milk is full-fat and use a vegan sweetener like agave or maple syrup. You can also add a tablespoon of coconut oil for extra creaminess.
* Spice it Up: Add a pinch of ground cinnamon or nutmeg to the ice cream base for a warm, comforting flavor.
* Chocolate Chunk Delight: Fold in some dark chocolate chunks or shavings for a richer, more indulgent treat.
* Rum Raisin Remix: Soak raisins in rum overnight and then fold them into the ice cream base before churning for a boozy twist.
I’m confident that you’ll absolutely love this Coconut Macadamia Nut Ice Cream. It’s the perfect dessert for a hot summer day, a special occasion, or simply when you’re craving something sweet and satisfying.
So, what are you waiting for? Gather your ingredients, dust off your ice cream maker, and get ready to embark on a culinary adventure! I promise you won’t be disappointed.
And most importantly, I’d love to hear about your experience! Did you try the recipe? Did you make any variations? What did your friends and family think? Please, share your thoughts and photos in the comments below. Your feedback is invaluable, and I can’t wait to see your creations! Happy ice cream making!
Coconut Macadamia Nut Ice Cream: The Ultimate Tropical Dessert
Rich and creamy vegan ice cream made with coconut milk, toasted macadamia nuts, and shredded coconut. A decadent and refreshing treat!
Ingredients
- 2 (13.5 ounce) cans full-fat coconut milk, refrigerated overnight
- 1 cup unsweetened shredded coconut
- 1 cup raw macadamia nuts, plus extra for garnish
- ¾ cup granulated sugar (or substitute with maple syrup or agave nectar to taste)
- ¼ teaspoon sea salt
- 1 teaspoon vanilla extract
- 2 tablespoons coconut oil, melted
- Optional: ¼ cup coconut cream (scooped from the top of the refrigerated coconut milk) for extra creaminess
Instructions
- Chill the Coconut Milk: Refrigerate cans of full-fat coconut milk overnight.
- Scoop Out the Coconut Cream: Open cans carefully and scoop out the thick coconut cream, leaving the watery liquid behind. Place cream in a high-speed blender or food processor. Add optional ¼ cup coconut cream for extra creaminess.
- Toast the Shredded Coconut: Preheat oven to 350°F (175°C). Spread shredded coconut on a baking sheet and toast for 5-7 minutes, or until lightly golden brown. Let cool completely.
- Toast the Macadamia Nuts: Spread macadamia nuts on a separate baking sheet and toast for 8-10 minutes, or until lightly golden brown. Let cool completely.
- Combine Ingredients in Blender: Add toasted coconut, toasted macadamia nuts, sugar (or sweetener), sea salt, vanilla extract, and melted coconut oil to the blender with the coconut cream.
- Blend Until Smooth: Blend on high speed until completely smooth and creamy, scraping down the sides as needed.
- Taste and Adjust: Taste and adjust sweetness or saltiness to your liking.
- Chill the Base: Pour the blended mixture into an airtight container and refrigerate for at least 4 hours, or preferably overnight.
- Prepare the Ice Cream Maker: Take your ice cream maker bowl out of the freezer. It should be rock solid. Assemble the ice cream maker according to the manufacturer’s instructions.
- Pour in the Chilled Base: Pour the chilled coconut macadamia base into the prepared ice cream maker.
- Churn According to Instructions: Turn on the ice cream maker and churn according to the manufacturer’s instructions. This usually takes about 20-30 minutes, or until the ice cream reaches a soft-serve consistency.
- Transfer to Freezer-Safe Container: Carefully transfer the churned ice cream to a freezer-safe container.
- Smooth the Surface: Gently smooth the surface of the ice cream with a spatula or spoon.
- Add Garnish (Optional): If desired, sprinkle some extra toasted macadamia nuts on top of the ice cream for added crunch and visual appeal.
- Freeze to Harden: Cover the container tightly and freeze for at least 2-3 hours, or preferably overnight, to allow the ice cream to harden completely.
- Scoop and Serve: Let the ice cream sit at room temperature for a few minutes to soften slightly before scooping. Enjoy!
Notes
- Use full-fat coconut milk for the creamiest results.
- Ensure coconut milk is well-chilled and ice cream maker bowl is properly frozen.
- Don’t over-churn the ice cream.
- Store in an airtight container to prevent freezer burn.
- Experiment with different flavors and add-ins.


Leave a Comment