

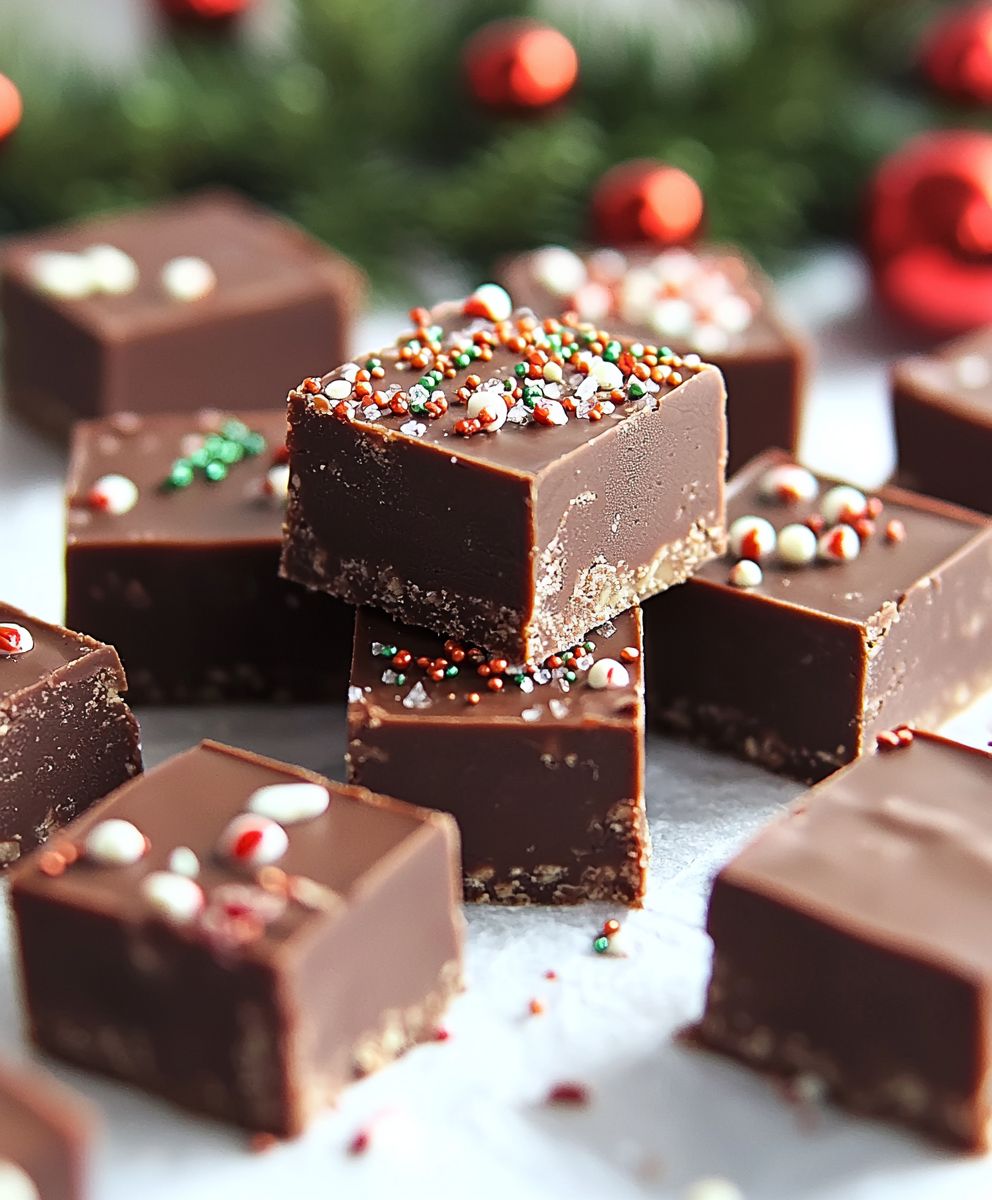
Christmas fudge, a decadent and delightful treat, is practically synonymous with the holiday season. Imagine biting into a square of creamy, melt-in-your-mouth goodness, its rich chocolate flavor perfectly complementing the festive cheer. Have you ever wondered why this simple confection holds such a special place in our hearts and on our holiday tables?
While the exact origins of fudge are debated, it’s widely believed to have originated in America in the late 19th century. Legend has it that a batch of caramels “fudged” up, resulting in this happy accident. Since then, fudge has evolved into countless variations, each as tempting as the last. But there’s something particularly magical about Christmas fudge. Perhaps it’s the association with cozy evenings by the fire, the joy of sharing homemade gifts, or simply the irresistible combination of sugar, butter, and chocolate that makes it so beloved.
People adore Christmas fudge for its incredible taste and satisfying texture. The smooth, creamy consistency is a delight to the senses, and the rich, sweet flavor is the perfect indulgence during the holidays. Plus, it’s relatively easy to make, making it a fantastic option for both experienced bakers and those just starting out. Whether you’re looking for a delicious dessert to serve at your Christmas gathering or a thoughtful homemade gift for friends and family, this recipe is sure to be a winner!

Ingredients:
- 1 pound (4 sticks) unsalted butter, softened
- 3 cups granulated sugar
- ? cup evaporated milk
- 1 (12 ounce) jar marshmallow creme
- 12 ounces semi-sweet chocolate chips
- 12 ounces milk chocolate chips
- 1 teaspoon vanilla extract
- 1 cup chopped walnuts or pecans (optional)
- Pinch of salt
- 1/2 cup crushed peppermint candies (for topping, optional)
Preparing the Fudge Base
- Cream the Butter: In a large, heavy-bottomed saucepan, melt the butter over medium heat. Make sure the butter is completely melted and there are no lumps. Using a heavy-bottomed pan is crucial to prevent scorching and ensure even heat distribution. I like to use a stainless steel pan for this.
- Combine Sugar and Milk: Add the granulated sugar and evaporated milk to the melted butter. Stir constantly with a wooden spoon or heat-resistant spatula until the sugar is completely dissolved. This is a critical step, so don’t rush it! You want a smooth, homogenous mixture before moving on. Undissolved sugar can result in a grainy fudge.
- Bring to a Boil: Once the sugar is dissolved, bring the mixture to a rolling boil over medium heat. A rolling boil means that the mixture continues to boil even while you are stirring. It’s important to monitor the heat carefully to prevent the mixture from burning.
- Cook to Soft-Ball Stage: Continue to cook the mixture, stirring constantly, until it reaches the soft-ball stage. This is where a candy thermometer comes in handy. The soft-ball stage is reached when the mixture registers 235-240°F (113-116°C) on a candy thermometer. If you don’t have a candy thermometer, you can test for the soft-ball stage by dropping a small amount of the hot mixture into a bowl of cold water. If it forms a soft, pliable ball that you can flatten between your fingers, it’s ready. This usually takes about 10-12 minutes. Be patient and keep stirring!
- Remove from Heat: Once the mixture reaches the soft-ball stage, immediately remove the saucepan from the heat. This is important to prevent overcooking, which can lead to a hard, brittle fudge.
Adding the Chocolate and Flavor
- Add Marshmallow Creme: Immediately add the marshmallow creme to the hot mixture. Stir vigorously until the marshmallow creme is completely melted and incorporated. This will give the fudge its smooth, creamy texture.
- Incorporate Chocolate Chips: Add the semi-sweet chocolate chips and milk chocolate chips to the mixture. Let them sit for a minute or two to soften slightly, then stir until they are completely melted and the mixture is smooth and glossy. Make sure there are no streaks of chocolate remaining.
- Stir in Vanilla and Salt: Add the vanilla extract and a pinch of salt. The vanilla enhances the flavor of the chocolate, and the salt balances the sweetness. Stir until well combined.
- Add Nuts (Optional): If you’re using nuts, add the chopped walnuts or pecans to the mixture and stir until evenly distributed.
Setting the Fudge
- Prepare the Pan: Line an 8×8 inch square baking pan with parchment paper, leaving an overhang on two sides. This will make it easy to lift the fudge out of the pan once it’s set. You can also lightly grease the pan with butter or cooking spray if you prefer.
- Pour into Pan: Pour the fudge mixture into the prepared pan and spread it evenly with a spatula.
- Add Toppings (Optional): If you’re using crushed peppermint candies, sprinkle them evenly over the top of the fudge. Gently press them into the surface so they adhere to the fudge.
- Chill to Set: Cover the pan with plastic wrap and refrigerate for at least 2-3 hours, or preferably overnight, to allow the fudge to set completely. The longer it chills, the firmer it will become.
Cutting and Serving
- Remove from Pan: Once the fudge is set, lift it out of the pan using the parchment paper overhang.
- Cut into Squares: Place the fudge on a cutting board and use a large, sharp knife to cut it into squares. You can cut it into any size you like, but I usually aim for 1-inch squares. For clean cuts, run the knife under hot water and wipe it dry between each cut.
- Store Properly: Store the fudge in an airtight container at room temperature for up to a week, or in the refrigerator for up to two weeks. You can also freeze it for longer storage. Wrap the fudge tightly in plastic wrap and then place it in a freezer bag. It will keep in the freezer for up to 2-3 months.
- Serve and Enjoy: Serve the fudge and enjoy! This Christmas fudge is perfect for holiday parties, gift-giving, or simply enjoying as a sweet treat.
Conclusion:
This Christmas fudge recipe isn’t just another dessert; it’s a shortcut to holiday happiness, a guaranteed crowd-pleaser, and a memory-maker all rolled into one delicious bite. Seriously, if you’re looking for that one treat that will have everyone asking for seconds (and the recipe!), this is it. The creamy texture, the rich chocolate flavor, and the festive sprinkles combine to create a truly irresistible experience. Its so easy to make, even the most novice baker can whip up a batch in no time, leaving you more time to enjoy the holiday season with loved ones.
But the best part? It’s incredibly versatile! While the recipe as written is divine, feel free to get creative and personalize it to your liking. For a peppermint twist, stir in a teaspoon of peppermint extract and top with crushed candy canes. If you’re a nut lover, add a handful of chopped walnuts, pecans, or almonds. Craving something a little more decadent? Swirl in some caramel sauce or peanut butter before the fudge sets. You could even add dried cranberries or cherries for a festive fruitcake-inspired flavor. The possibilities are truly endless!
Serving suggestions are just as flexible. Of course, this Christmas fudge is perfect on its own, enjoyed with a cup of hot cocoa or coffee. But it also makes a wonderful addition to a holiday dessert platter, alongside cookies, pies, and other festive treats. You can cut it into small squares for a bite-sized indulgence, or larger pieces for a more substantial dessert. It also makes a fantastic homemade gift! Package it in a pretty tin or box, tie it with a ribbon, and you have a thoughtful and delicious present for friends, family, neighbors, or coworkers. Trust me, they’ll appreciate the effort and the incredible taste.
I’ve made this fudge countless times, and it’s always a hit. The simplicity of the recipe combined with the amazing results makes it a winner every time. It’s become a tradition in my family, and I hope it becomes one in yours too.
So, what are you waiting for? Gather your ingredients, put on some holiday music, and get ready to create some magic in your kitchen. I promise you won’t regret it. This Christmas fudge is more than just a recipe; it’s an experience.
And now, the most important part: I want to hear about your experience! Did you try the recipe? What variations did you make? How did your family and friends react? Share your photos, your stories, and your tips in the comments below. I can’t wait to see what you create and hear all about your fudge-making adventures. Happy baking, and happy holidays! I hope this recipe brings you as much joy as it has brought me and my family over the years. It’s truly a special treat that embodies the spirit of the season.
Christmas Fudge: The Ultimate Holiday Recipe Guide
Rich, creamy chocolate fudge perfect for the holidays! Easy recipe combines semi-sweet and milk chocolate with marshmallow creme for a smooth texture and optional nuts and peppermint for a festive touch.
Ingredients
- 1 pound (4 sticks) unsalted butter, softened
- 3 cups granulated sugar
- ? cup evaporated milk
- 1 (12 ounce) jar marshmallow creme
- 12 ounces semi-sweet chocolate chips
- 12 ounces milk chocolate chips
- 1 teaspoon vanilla extract
- 1 cup chopped walnuts or pecans (optional)
- Pinch of salt
- 1/2 cup crushed peppermint candies (for topping, optional)
Instructions
- Cream the Butter: In a large, heavy-bottomed saucepan, melt the butter over medium heat. Make sure the butter is completely melted and there are no lumps.
- Combine Sugar and Milk: Add the granulated sugar and evaporated milk to the melted butter. Stir constantly with a wooden spoon or heat-resistant spatula until the sugar is completely dissolved.
- Bring to a Boil: Once the sugar is dissolved, bring the mixture to a rolling boil over medium heat.
- Cook to Soft-Ball Stage: Continue to cook the mixture, stirring constantly, until it reaches the soft-ball stage (235-240°F or 113-116°C on a candy thermometer). If you don’t have a candy thermometer, you can test for the soft-ball stage by dropping a small amount of the hot mixture into a bowl of cold water. If it forms a soft, pliable ball that you can flatten between your fingers, it’s ready. This usually takes about 10-12 minutes.
- Remove from Heat: Once the mixture reaches the soft-ball stage, immediately remove the saucepan from the heat.
- Add Marshmallow Creme: Immediately add the marshmallow creme to the hot mixture. Stir vigorously until the marshmallow creme is completely melted and incorporated.
- Incorporate Chocolate Chips: Add the semi-sweet chocolate chips and milk chocolate chips to the mixture. Let them sit for a minute or two to soften slightly, then stir until they are completely melted and the mixture is smooth and glossy.
- Stir in Vanilla and Salt: Add the vanilla extract and a pinch of salt. Stir until well combined.
- Add Nuts (Optional): If you’re using nuts, add the chopped walnuts or pecans to the mixture and stir until evenly distributed.
- Prepare the Pan: Line an 8×8 inch square baking pan with parchment paper, leaving an overhang on two sides.
- Pour into Pan: Pour the fudge mixture into the prepared pan and spread it evenly with a spatula.
- Add Toppings (Optional): If you’re using crushed peppermint candies, sprinkle them evenly over the top of the fudge. Gently press them into the surface so they adhere to the fudge.
- Chill to Set: Cover the pan with plastic wrap and refrigerate for at least 2-3 hours, or preferably overnight, to allow the fudge to set completely.
- Remove from Pan: Once the fudge is set, lift it out of the pan using the parchment paper overhang.
- Cut into Squares: Place the fudge on a cutting board and use a large, sharp knife to cut it into squares. For clean cuts, run the knife under hot water and wipe it dry between each cut.
- Store Properly: Store the fudge in an airtight container at room temperature for up to a week, or in the refrigerator for up to two weeks. You can also freeze it for longer storage. Wrap the fudge tightly in plastic wrap and then place it in a freezer bag. It will keep in the freezer for up to 2-3 months.
- Serve and Enjoy: Serve the fudge and enjoy!
Notes
- Using a heavy-bottomed saucepan is crucial to prevent scorching.
- Stir constantly while cooking the sugar and milk mixture to prevent burning and ensure the sugar dissolves completely. Undissolved sugar can result in grainy fudge.
- A candy thermometer is recommended for accurate results when cooking to the soft-ball stage.
- For clean cuts, run the knife under hot water and wipe it dry between each cut.
Leave a Comment