

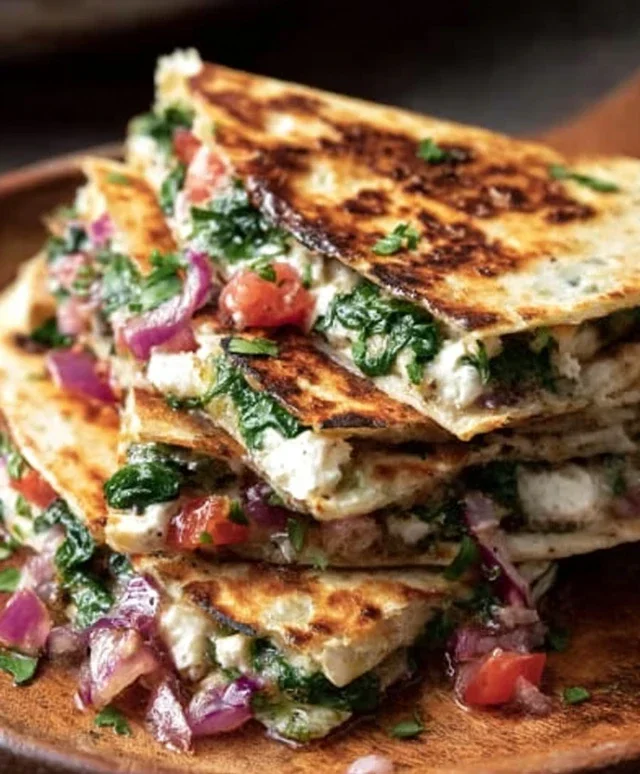
Spinach and Feta Quesadillas are more than just a quick meal; they’re a burst of Mediterranean sunshine wrapped in a warm tortilla, and I’m absolutely obsessed with them. There’s something incredibly satisfying about the way the savory, crum extractbly feta melts into the tender spinach, all held together by a perfectly golden-brown tortilla. This dish hits all the right notes: it’s incredibly easy to whip up, making it a weeknight savior, yet it feels elevated enough for a casual get-together or a satisfying lunch. People adore these Spinach and Feta Quesadillas because they offer a fantastic balance of flavors and textures. The slight tang of the feta, the earthy freshness of the spinach, and the comforting crisp of the tortilla create a culinary harmony that’s hard to resist. What truly makes these quesadillas special is their versatility and how quickly they come together without sacrificing flavor.
A Weeknight Wonder
Simple Ingredients, Incredible Taste

Spinach and Feta Quesadillas
There’s something incredibly satisfying about a perfectly grilled quesadilla. The crispy tortilla, the gooey cheese, and the flavorful filling – it’s a comfort food classic that’s surprisingly easy to make at home. Today, we’re elevating this beloved dish with a delicious combination of vibrant spinach, salty feta, and savory sun-dried tomatoes. These Spinach and Feta Quesadillas are quick enough for a weeknight meal but special enough to impress guests. They’re also incredibly versatile, allowing you to easily customize them with your favorite additions.
Ingredients:
Cooking Instructions:
This recipe is designed for simplicity and speed. We’ll focus on building flavor and achieving that perfect crispy exterior.
Prepare Your Fillings: Before we start cooking, it’s essential to have all your ingredients prepped and ready to go. This makes the assembly process smooth and prevents any one ingredient from overcooking. Take your fresh spinach and give it a good chop. If the leaves are large, roughly chopping them will ensure they distribute evenly throughout the quesadilla and wilt down nicely. Next, crum extractble your feta cheese if it’s not already in crum extractbles. Slice your black olives if they are whole. If you’re using sun-dried tomatoes that are whole or in large pieces, chop them into smaller, manageable bits. Finally, dice your cooked grilled chicken into small, bite-sized pieces. Having everything ready in separate bowls or piles will be a lifesaver when it’s time to assemble.
Wilt the Spinach: In a medium skillet, heat about half a teaspoon of olive oil or butter over medium heat. Add the chopped spinach and cook, stirring frequently, until it’s just wilted. This usually takes only 1-2 minutes. You don’t want to overcook it and make it mushy. Once wilted, remove the spinach from the skillet and set it aside in a bowl. Gently squeeze out any excess moisture from the spinach; this is an important step to prevent your quesadillas from becoming soggy.
Assemble Your Quesadillas: Now for the fun part! Lay out your four tortillas flat. On one half of each tortilla, layer your ingredients. Start with a generous sprinkle of the crum extractbled feta cheese. This will act as a binder for the other ingredients. Next, evenly distribute the wilted spinach over the feta. Then, scatter the chopped sun-dried tomatoes, sliced black olives, and diced grilled chicken over the spinach. Don’t overstuff the tortillas, as this can make them difficult to fold and cook evenly. You want a balanced ratio of filling to tortilla.
Fold and Prepare for Grilling: Carefully fold the empty half of each tortilla over the filling, creating a half-moon shape. Gently press down to help everything hold together. You can also use a fork to lightly crimp the edges of the tortillas, which helps seal them and gives a nice visual appeal. However, this step is optional. At this point, you can either cook them one at a time or cook two at a time if your skillet is large enough.
Grill to Golden Perfection: Heat the remaining olive oil or butter in your skillet over medium heat. Once the oil is shimmering or the butter is melted and slightly bubbly, carefully place your assembled quesadillas into the skillet. Cook for 3-5 minutes per side, or until the tortillas are golden brown and crispy, and the cheese is melted and gooey. Keep an eye on them, as cooking times can vary depending on your stove and the type of tortilla you’re using. You might need to adjust the heat slightly to prevent burning while ensuring the inside is heated through and the cheese is fully melted. If you are cooking two at a time, ensure there is enough space between them to allow for even cooking and easy flipping.
Serve and Enjoy: Once your quesadillas are beautifully golden and the filling is hot and melty, remove them from the skillet. It’s often best to cut them into wedges using a pizza cutter or a sharp knife before serving. This makes them easier to handle and eat. Serve them immediately while they are warm and crispy. These Spinach and Feta Quesadillas are fantastic on their own, but they are also delicious served with a side of salsa, sour cream, or guacamole.

Conclusion:
I hope you enjoyed learning how to make these delicious Spinach and Feta Quesadillas! This recipe is fantastic because it’s incredibly quick and easy, perfect for a weeknight meal or a satisfying lunch. The combination of earthy spinach, tangy feta, and warm tortillas creates a flavor profile that’s both comforting and vibrant. They’re a wonderfully healthy and flavorful option that you can whip up in minutes.
Serve these Spinach and Feta Quesadillas hot, straight off the griddle. They are wonderful on their own, but I also love them with a dollop of sour cream or Greek yogurt, a side of salsa, or even some guacamole for an extra burst of freshness. For variations, feel free to add some sautéed onions or mushrooms for added depth, or even a pinch of red pepper flakes for a bit of heat. Don’t hesitate to experiment with different cheeses too – Monterey Jack or cheddar would also be delicious additions! I truly encourage you to give this recipe a try; I’m confident you’ll find it to be a new favorite in your kitchen.
Frequently Asked Questions:
Can I make these ahead of time?
While quesadillas are best enjoyed fresh off the griddle for optimal crispness, you can prepare the filling (cooked spinach and crum extractbled feta) ahead of time and store it in the refrigerator for up to two days. Then, simply assemble and cook your quesadillas just before serving.
What other vegetables can I add?
There are many fantastic vegetable additions! Sautéed mushrooms, caramelized onions, bell peppers (any color), or even some roasted sweet potato cubes would be delicious. Just ensure any added vegetables are cooked before adding them to the quesadilla to prevent soggin extractess.
Are these quesadillas spicy?
By themselves, these Spinach and Feta Quesadillas are not spicy. However, you can easily add a pinch of red pepper flakes to the spinach mixture if you like a little heat. Serving with a spicy salsa will also add a kick!
Spinach and Feta Quesadillas with Grilled Chicken
Quick and flavorful quesadillas filled with fresh spinach, crumbled feta cheese, sun-dried tomatoes, black olives, and savory grilled chicken. Perfect for a light lunch or dinner.
Ingredients
-
4 medium tortillas (flour, whole wheat, or gluten-free)
-
2 cups fresh spinach, chopped
-
1 cup feta cheese, crumbled
-
2 tablespoons olive oil
-
1/4 cup sun-dried tomatoes, chopped
-
1/4 cup black olives, sliced
-
1/2 cup cooked grilled chicken, diced
Instructions
-
Step 1
In a bowl, combine the chopped spinach, crumbled feta cheese, chopped sun-dried tomatoes, sliced black olives, and diced grilled chicken. Mix well. -
Step 2
Lay out the tortillas. Evenly distribute the spinach and feta mixture over half of each tortilla. -
Step 3
Fold the other half of each tortilla over the filling to create a half-moon shape. -
Step 4
Heat the olive oil or butter in a large skillet or on a griddle over medium heat. -
Step 5
Carefully place the folded quesadillas into the hot skillet. Cook for 3-5 minutes per side, or until golden brown and the cheese is melted. -
Step 6
Remove from skillet, let cool slightly, and cut into wedges. Serve immediately.
Important Information
Nutrition Facts (Per Serving)
It is important to consider this information as approximate and not to use it as definitive health advice.
Allergy Information
Please check ingredients for potential allergens and consult a health professional if in doubt.


Leave a Comment