

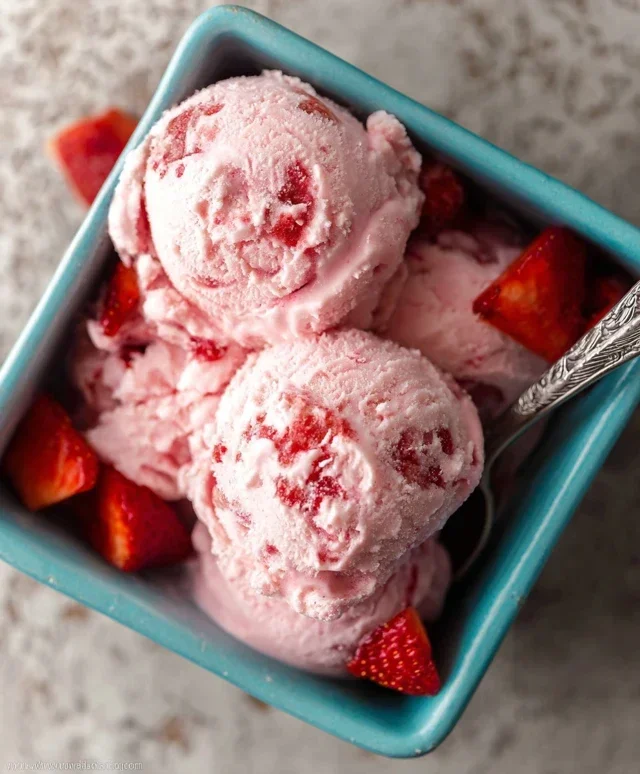
Homemade strawberry ice cream is more than just a dessert; it’s a portal to sun-drenched afternoons and pure, unadulterated joy. There’s a reason why this classic flavor reigns supreme. The vibrant sweetness of ripe strawberries, swirled into a rich, creamy base, creates a symphony of textures and tastes that’s simply irresistible. Forget the freezer aisle; the magic of creating your own homemade strawberry ice cream lies in the delightful process and the unparalleled freshness you achieve. Imagin extracte the scent of sweet berries filling your kitchen, the satisfying churn of the ice cream maker, and the first spoonful of your perfectly crafted, luscious creation. This isn’t just about making ice cream; it’s about capturing the essence of summer in every single bite. Prepare yourself for a truly special treat that will have everyone asking for seconds!

Homemade Strawberry Ice Cream
There’s something truly magical about homemade ice cream. The creamy texture, the vibrant flavors – it’s a world away from store-bought. And when it comes to classic flavors, nothing beats the sweet, juicy taste of fresh strawberries. This recipe for homemade strawberry ice cream is incredibly simple, requiring no special equipment beyond a freezer and a few common kitchen tools. The result is a luscious, flavorful treat that will have everyone asking for seconds. Forget those artificial flavors and preservatives; we’re going all-natural and utterly delicious.
Ingredients:
Making the Strawberry Base
The first step to achieving that incredible strawberry flavor is to create a concentrated strawberry puree. This involves gently cooking the diced strawberries with a touch of sweetness and acidity to bring out their best qualities.
1. In a medium saucepan, combine the hulled and diced strawberries, honey, granulated sugar, and lemon juice. The lemon juice might seem counterintuitive in a sweet treat, but it actually brightens the strawberry flavor and adds a subtle tang that balances the sweetness beautifully. It also helps to activate the pectin in the strawberries, contributing to a smoother final texture.
2. Place the saucepan over medium heat. Stir the ingredients together until the sugar begin extracts to dissolve. Once you see some liquid forming at the bottom of the pan, reduce the heat to low and let the mixture simmer gently. You’re not looking for a rolling boil, but rather a gentle bubbling. Stir occasionally to prevent sticking.
3. Allow the strawberries to simmer for about 10-15 minutes, or until they have softened considerably and released a good amount of their juices. The mixture will start to look like a thick, syrupy compote. Remove the saucepan from the heat and let it cool slightly.
Creating the Creamy Ice Cream Mixture
Once our strawberry base has had a chance to cool, we’ll combine it with the rich dairy components and flavorings to create the foundation for our ice cream.
4. Once the strawberry mixture has cooled down to a warm, but not hot, temperature (you should be able to touch it comfortably), it’s time to blend it. You can do this using an immersion blender directly in the saucepan, or carefully transfer it to a regular blender or food processor. Blend until you have a smooth puree. If you prefer a smoother ice cream with no strawberry seeds, you can strain the puree through a fine-mesh sieve at this point, pressing down on the solids to extract as much liquid as possible. However, I personally enjoy the slight texture the tiny seeds provide, so I usually skip this step.
5. In a separate large bowl, combine the heavy whipping cream, half and half, and vanilla extract. Whisk these ingredients together until they are well incorporated. The heavy cream provides the richness and fat content that makes ice cream so luscious, while the half and half thins it out just enough to prevent it from becoming too heavy. The vanilla extract enhances the overall flavor profile, complementing the sweetness of the strawberries.
6. Now, gently fold the strawberry puree into the cream mixture. Start by adding about half of the strawberry puree and stirring it in until just combined. Then, add the remaining puree and continue to fold until the entire mixture has a uniform pink hue. Don’t overmix at this stage; we just want everything incorporated smoothly.
Freezing and Chilling
This is where the magic truly happens. We’ll be using a no-churn method, meaning you don’t need an ice cream maker. This makes homemade ice cream accessible to everyone!
7. Pour the strawberry cream mixture into a freezer-safe container. An airtight container is best to prevent ice crystals from forming on the surface. I often use a loaf pan, covered tightly with plastic wrap, and then foil. Place the container in the coldest part of your freezer. Now, patience is key. You’ll need to let the ice cream freeze for at least 4-6 hours, but overnight is even better for a firmer set. During this time, the ice cream will gradually firm up.
8. For an even creamier texture and to further minimize ice crystals, you can stir the ice cream every hour or so during the first 3-4 hours of freezing. This breaks up any ice crystals that might be forming. You can use a fork or a whisk for this. Just take the container out, give it a good stir, and pop it back in the freezer. It might seem like a bit of extra effort, but it makes a noticeable difference in the final texture.
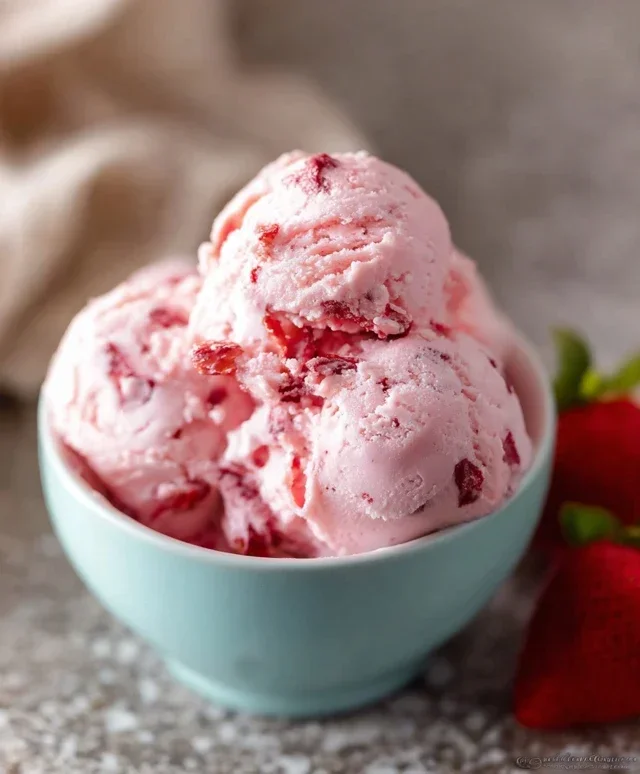
Once your homemade strawberry ice cream is fully frozen and firm, scoop it into bowls and enjoy the fruits of your labor! This is a perfect treat for a warm summer day, a special occasion, or just because you deserve something sweet. You can garnish it with fresh strawberries or a sprig of mint for an extra special touch.
Conclusion:
Making homemade strawberry ice cream is an incredibly rewarding experience, and this recipe makes it delightfully simple. The beauty of this approach lies in its fresh, vibrant strawberry flavor, free from artificial additives. You’ll taste the difference that real fruit makes! It’s creamy, luscious, and utterly satisfying, perfect for a warm summer day or any time you crave a sweet treat. The process is straightforward, and the result is a gourmet ice cream you’ll be proud to serve to friends and family.
I love serving scoops of this delicious homemade strawberry ice cream on its own, but it’s also fantastic with a drizzle of chocolate sauce, a sprinkle of toasted nuts, or alongside a slice of warm, freshly baked pound cake. For those who enjoy experimenting, consider adding a splash of balsamic vinegar to the strawberries before pureeing for a more complex, tangy flavor, or fold in some fresh basil for an unexpected herbaceous note. Don’t be afraid to adjust the sweetness to your personal preference.
Give this homemade strawberry ice cream recipe a try; I promise you won’t be disappointed. The joy of creating something so delicious from scratch is truly unparalleled. Happy churning!
Frequently Asked Questions:
Can I make this recipe without an ice cream maker?
Yes, you can! While an ice cream maker yields the creamiest texture, you can achieve a delicious result without one. After chilling the base, pour it into a freezer-safe container. Every 30-45 minutes for the first 2-3 hours, remove it from the freezer and vigorously whisk to break up ice crystals. This manual churning will help create a smoother consistency.
How long will homemade strawberry ice cream last?
Homemade strawberry ice cream is best enjoyed within 1-2 weeks. Store it in an airtight container in the coldest part of your freezer. The texture might change slightly over time as ice crystals can form, but it will still be wonderfully tasty.
Can I use frozen strawberries instead of fresh?
Absolutely! Frozen strawberries work wonderfully in this recipe. Thaw them completely before pureeing. You might notice the color is even more vibrant. Just ensure they are well-drained if there’s excess liquid after thawing.
Homemade Strawberry Ice Cream
A simple and delicious homemade strawberry ice cream recipe.
Ingredients
-
1 1/2 cups strawberries, hulled and diced
-
2 Tbsp honey
-
1/2 cup granulated sugar
-
1 tsp lemon juice
-
1 cup heavy whipping cream
-
1/2 cup half and half
-
1 tsp vanilla extract
Instructions
-
Step 1
In a bowl, combine diced strawberries with granulated sugar and lemon juice. Let sit for 30 minutes to macerate. -
Step 2
Puree the strawberry mixture until smooth using an immersion blender or food processor. -
Step 3
In a separate bowl, whisk together heavy whipping cream, half and half, honey, and vanilla extract until well combined. -
Step 4
Gently fold the strawberry puree into the cream mixture. -
Step 5
Pour the mixture into an ice cream maker and churn according to the manufacturer’s instructions. -
Step 6
Transfer the churned ice cream to an airtight container and freeze for at least 2-4 hours to firm up.
Important Information
Nutrition Facts (Per Serving)
It is important to consider this information as approximate and not to use it as definitive health advice.
Allergy Information
Please check ingredients for potential allergens and consult a health professional if in doubt.
Leave a Comment