

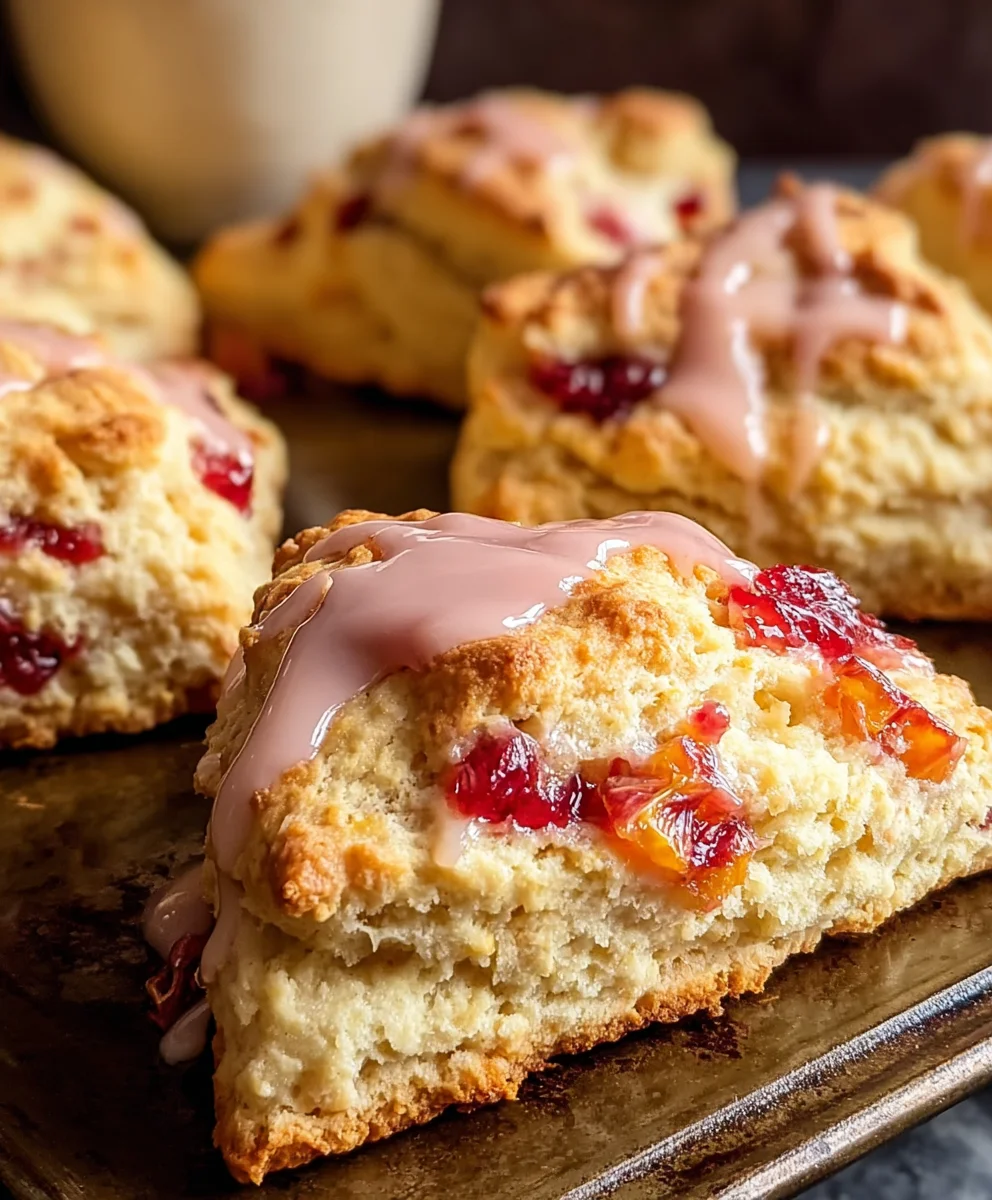
Blood Orange Scones are more than just a pastry; they’re a vibrant burst of sunshine on a plate, a delightful indulgence that elevates any morning or afternoon tea. What is it about these beautiful citrus-infused delights that captures our hearts and taste buds? Perhaps it’s the stunning ruby-red hue that hints at the unique flavor within, a sophisticated twist on the classic scone. Or maybe it’s the perfect balance of tender crum extractb and a subtle, sweet-tart tang that makes each bite utterly irresistible. We adore them for their simplicity, yet the depth of flavor provided by the blood orange is truly remarkable, offering a complex sweetness with just a whisper of raspberry and cherry. This recipe for Blood Orange Scones will guide you to create a batch that’s not only visually striking but also incredibly delicious, proving that sometimes, the most magical flavors come from the most unexpected sources. Get ready to impress yourself and anyone lucky enough to share these with you!

Ingredients:
- 2 cups all-purpose flour
- ¼ cup granulated sugar
- 1 tablespoon baking powder
- ½ teaspoon salt
- ½ cup cold unsalted butter, cubed
- ½ cup heavy cream
- 1 large egg
- 2 tablespoons blood orange zest
- ¼ cup blood orange juice
- 1 cup powdered sugar
- 2-3 tablespoons blood orange juice (for glaze)
- 1 teaspoon blood orange zest (for glaze)
Preparing the Dough for Your Blood Orange Scones
Step 1: Combine the Dry Ingredients
Let’s start by getting all our dry ingredients together in a large mixing bowl. This ensures everything is evenly distributed for consistent scones. Into the bowl, add your 2 cups of all-purpose flour, ¼ cup of granulated sugar, 1 tablespoon of baking powder, and ½ teaspoon of salt. Give these a good whisk with a fork or a balloon whisk. The baking powder is crucial for giving our scones that lovely lift and tender texture, while the salt balances the sweetness.
Step 2: Cut in the Cold Butter
Now for the butter! It’s really important that your ½ cup of unsalted butter is cold and cut into small cubes. This is a key step for creating flaky scones. You can use a pastry blender, two forks, or even your fingertips to cut the butter into the flour mixture. You want to work quickly so the butter doesn’t melt. The goal is to break the butter down into pea-sized pieces, creating little pockets of fat that will steam and create those wonderful layers as the scones bake. Some people prefer to pulse the flour and butter in a food processor until it resembles coarse meal – this works too, just be careful not to over-process and turn it into a paste.
Step 3: Incorporate the Wet Ingredients and Flavorings
Next, we’ll add the liquid ingredients and that vibrant blood orange flavor. In a separate, smaller bowl, whisk together your ½ cup of heavy cream, 1 large egg, 2 tablespoons of blood orange zest, and ¼ cup of blood orange juice. The zest will impart an intense, aromatic citrus punch that’s characteristic of blood oranges, while the juice adds a subtle tang and moisture. Pour this wet mixture into the dry ingredients.
Step 4: Gently Mix the Dough
Now, using a fork or a spatula, gently mix the wet and dry ingredients together until just combined. Be careful not to overmix! Overmixing develops the gluten in the flour, which can lead to tough scones. You should have a slightly shaggy, sticky dough. It’s okay if there are a few dry bits still visible; we’ll bring it all together in the next step.
Step 5: Shape and Chill the Dough
Turn the dough out onto a lightly floured surface. Gently bring the dough together with your hands, folding it a few times to form a cohesive ball. Don’t knead it vigorously! Press the dough into a disc about 1 to 1 ½ inches thick. You can use a knife or a bench scraper to cut the disc into 8 wedges, just like cutting a pizza. If you prefer round scones, you can pat the dough into a thick circle and use a round biscuit cutter. For the best texture and to ensure the butter stays cold, place the cut scones onto a baking sheet lined with parchment paper and pop them into the refrigerator or freezer for at least 15-20 minutes. This chilling step is vital for a tender crum extractb and proper rise.
Baking and Glazing Your Blood Orange Scones
Step 6: Baking to Perfection
Preheat your oven to 400°F (200°C). Once the oven is hot and your scones have had their chilling time, arrange them on the prepared baking sheet, leaving a little space between each one. Bake for 18-22 minutes, or until the scones are golden brown on top and a toothpick inserted into the center comes out clean. The aroma of blood orange will fill your kitchen! Once baked, remove them from the oven and let them cool on the baking sheet for a few minutes before transferring them to a wire rack to cool completely. This cooling period is important before glazing.
Step 7: Crafting the Blood Orange Glaze
While the scones are cooling, let’s make the vibrant blood orange glaze. In a small bowl, whisk together your 1 cup of powdered sugar with 2-3 tablespoons of blood orange juice. Start with 2 tablespoons and add more a little at a time until you achieve a smooth, pourable consistency. You want it thick enough to coat the scones but thin enough to drizzle easily. Stir in the 1 teaspoon of blood orange zest for an extra burst of citrus aroma and a beautiful fleck of color throughout the glaze. Taste and adjust sweetness or citrus tang as needed.
Step 8: Glazing the Blood Orange Scones
Once the scones are completely cool, it’s time to adorn them with the glorious glaze. You can either drizzle the glaze generously over the tops using a spoon or pour it over each scone, letting it drip down the sides. For a more decorative finish, you can use a piping bag with a small tip. The vibrant color of the blood orange glaze against the golden scone is truly a feast for the eyes. The glaze not only adds another layer of sweet, citrusy flavor but also gives these Blood Orange Scones a beautiful finished appearance, making them perfect for a special breakfast, brunch, or afternoon tea. Allow the glaze to set for a few minutes before serving.

Conclusion:
There you have it – a delightful guide to crafting the perfect Blood Orange Scones! We’ve walked through each step, from selecting the ripest blood oranges to achieving that wonderfully crum extractbly, tender texture. These scones are more than just a treat; they’re a burst of sunshine in every bite, perfect for elevating your morning coffee, afternoon tea, or any occasion that calls for a touch of homemade goodness.
To truly savor the vibrant flavor of these Blood Orange Scones, I recommend serving them warm, perhaps with a dollop of clotted cream or a drizzle of homemade blood orange glaze. They also pair beautifully with a light berry jam. Don’t be afraid to experiment! For a twist, try adding a sprinkle of cardamom to the dough or substituting some of the flour with almond flour for a nuttier profile. You can even incorporate a hint of rosemary for an unexpected herbaceous note. I truly hope you enjoy baking and indulgin extractg in these exquisite Blood Orange Scones!
Frequently Asked Questions:
Can I use regular oranges if I can’t find blood oranges?
Absolutely! While blood oranges offer a unique, slightly berry-like sweetness and beautiful color, regular oranges will still yield delicious scones. You might want to add a touch more zest from a regular orange to amp up the citrus flavor, and perhaps a tiny drop of red food coloring if you’re aiming for a similar visual appeal, though it’s entirely optional.
How should I store leftover Blood Orange Scones?
Once cooled completely, store your Blood Orange Scones in an airtight container at room temperature for up to 2-3 days. For longer storage, you can freeze them. Wrap them tightly in plastic wrap, then in foil or place them in a freezer-safe bag for up to 2 months. Reheat gently in a low oven or toaster oven to restore their lovely texture.
Blood Orange Scones – Zesty Citrus Baking
Deliciously zesty scones infused with the vibrant flavor of blood oranges, perfect for breakfast, brunch, or afternoon tea. Features a bright citrus glaze.
Ingredients
-
2 cups all-purpose flour
-
1/4 cup granulated sugar
-
1 tablespoon baking powder
-
1/2 teaspoon salt
-
1/2 cup cold unsalted butter, cubed
-
1/2 cup heavy cream
-
1 large egg
-
2 tablespoons blood orange zest
-
1/4 cup blood orange juice
-
1 cup powdered sugar
-
2-3 tablespoons blood orange juice (for glaze)
-
1 teaspoon blood orange zest (for glaze)
Instructions
-
Step 1
Combine dry ingredients: In a large bowl, whisk together 2 cups all-purpose flour, 1/4 cup granulated sugar, 1 tablespoon baking powder, and 1/2 teaspoon salt. Ensure everything is evenly distributed. -
Step 2
Cut in cold butter: Add 1/2 cup cold unsalted butter, cubed, to the flour mixture. Use a pastry blender, two forks, or fingertips to cut the butter into pea-sized pieces, creating pockets of fat for flakiness. -
Step 3
Incorporate wet ingredients and flavorings: In a separate bowl, whisk together 1/2 cup heavy cream, 1 large egg, 2 tablespoons blood orange zest, and 1/4 cup blood orange juice. Pour this mixture into the dry ingredients. -
Step 4
Gently mix the dough: Using a fork or spatula, gently mix until just combined. Do not overmix. The dough should be slightly shaggy and sticky. -
Step 5
Shape and chill the dough: Turn dough onto a lightly floured surface. Gently bring together, fold a few times, and press into a 1-1.5 inch thick disc. Cut into 8 wedges. Place on a parchment-lined baking sheet and chill in the refrigerator or freezer for at least 15-20 minutes. -
Step 6
Bake the scones: Preheat oven to 400°F (200°C). Bake chilled scones for 18-22 minutes, or until golden brown and a toothpick inserted into the center comes out clean. Cool on a wire rack completely. -
Step 7
Prepare the glaze: Whisk together 1 cup powdered sugar with 2-3 tablespoons blood orange juice until smooth and pourable. Stir in 1 teaspoon blood orange zest for extra flavor and color. -
Step 8
Glaze the scones: Once completely cool, drizzle or pour the glaze over the scones. Allow the glaze to set before serving.
Important Information
Nutrition Facts (Per Serving)
It is important to consider this information as approximate and not to use it as definitive health advice.
Allergy Information
Please check ingredients for potential allergens and consult a health professional if in doubt.


Leave a Comment